
How to install OpenRemote on
QNAP Turbo NAS?
OpenRemote is a software integration platform for residential and commercial building automation. OpenRemote running on the QNAP Turbo NAS (hereinafter referred to as the “Turbo NAS” or the “NAS”) offers the best automation solution that fits everywhere, at home, in the office, or used in large-scale projects.
OpenRemote for the Turbo NAS consists of two main components:
1. OpenRemote controller is the central piece at the back end to connect the home automation devices.
2. OpenRemote designer is a platform for users to design the user interface on the front end to control and monitor their devices.
1. Install the OpenRemote controller on the Turbo NAS (via App Center)
The Java Runtime Environment (JRE) is required for OpenRemote. Before installing the OpenRemote controller, please follow the steps below to install the JRE on the Turbo NAS.
a. Install Java Runtime Environment (JRE)
Note: The JRE is only available as a ready-made installable tool for the x86-based Turbo NAS models (TS-x39, TS-x59, TS-509, TS-809, TS-809U-RP, SS-x39, TS-x59 Pro+, TS-x59 Pro II, and TS-x79 series). For ARM-based Turbo NAS models, please refer to the QNAP forum.
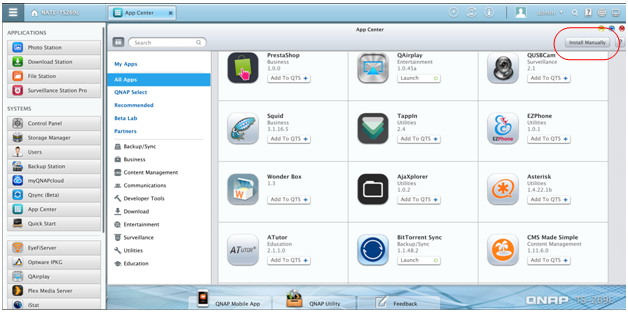
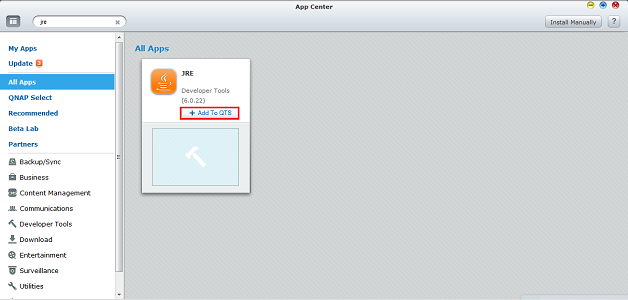
Login the administration console of the Turbo NAS. Navigate to “App Center” > “App Apps”. Enter JRE in the “Search” field. Click “Add to QTS” when the add-on is shown. Enable the add-on upon successful installation.
The successful installation can be verified by setting up an SSH connection (using PuTTY or a similar application) to the Turbo NAS and running “java”.
b. Install OpenRemote controller
To install the OpenRemote controller (QPKG add-on) on the Turbo NAS, login the administration console. Navigate to “App Center” > “All Apps” and search for “OpenRemote”. Click “Add to QTS” when the add-on shows up. Enable the add-on upon successful installation.

To access the web page of the OpenRemote controller, enter http://NAS_IP:8088/controller/ or http://servername:8088/controller/ in a web browser.
The OpenRemote controller attempts to listen on port 8080 by default. However, the port 8080 has been taken by other services of the Turbo NAS. Therefore, the OpenRemote add-on uses 8088 instead.
To assign a specific port number, e.g. 8081, for the OpenRemote controller, navigate to the “conf” folder. Open “server.xml” and search for the following section:
<!-- Documentation at : Java HTTP Connector: /docs/config/http.html (blocking & non-blocking) Java AJP Connector: /docs/config/ajp.html APR (HTTP/AJP) Connector: /docs/apr.html --> <connector connectiontimeout="20000" executor="HTTP-ThreadPool" port="8088" protocol="HTTP/1.1" redirectport="8443" />
Change the port value to 8081 (or any other available port number) so you will have:
<connector connectiontimeout="20000" executor="HTTP-ThreadPool" port="8081" protocol="HTTP/1.1" redirectport="8443" />
2. Integrate your first Z-Wave device by OpenRemote designer
OpenRemote allows the integration of a large number of devices and protocols. To get started with your first home control system, we will explain how to integrate a few Z-Wave devices. If you prefer other devices or protocols, see “Integrate Devices & Protocols”.
Configuration of system
To be able to configure your Z-Wave devices, you must first add (include) the devices individually to the Z-Wave mesh network. Here we use an Aeon Labs Aeon Z-Stick 2 (or equivalent) which maintains a central table of all included devices. This ensures that your system uses unique addresses.
If you start with just one or two switches, use the inclusion function of the Z-stick. If you have OpenRemote running on your Turbo NAS, make sure that you stop the add-on from the App Center before removing the Z-stick from the NAS. Take the Z-stick to the Z-Wave device you want to include to the network and press the button on the Z-stick, which starts to flash to indicate the inclusion mode. Next press the inclusion button of the switch or another device. Please refer to the user manual of the device to find out how long you need to press the button. Mostly it is three times in 1.5 seconds.
OpenRemote uses Z-Wave serial API to communicate with a Z-Wave controller. Aeon Z-Stick 2 is an OpenRemote certified and tested Z-Wave controller with a serial API.
OpenRemote offers several types of accounts that meet your needs. For more information, please refer to http://files1.qnap.com/news/pressresource/product/QNAP_OpenRemote.pdf.
• For Free Designer users
OpenRemote Free Designer is available in the QNAP App Center. Community users can use the free Z-Wave version offered, limited to a total of 10 devices (10 nodes in the Z-Wave mesh network), by installing a library file in the Turbo NAS. The installation steps are described as below.
1. Download and save the file zwave.jar from OpenRemote (http://download.openremote.org/free/zwave).
2. Upload zwave.jar to the “Public” network share of the Turbo NAS. You can do so by logging in the File Station and using the “Upload” function via a web browser.
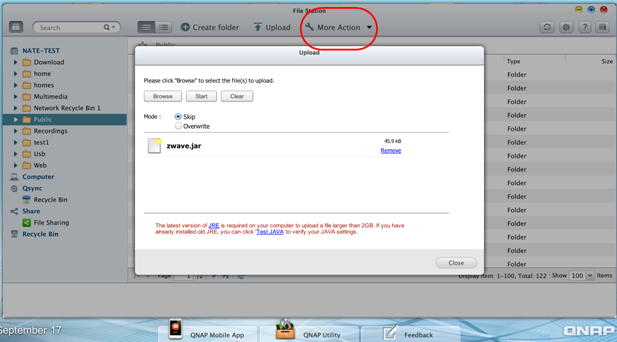
3. Copy zwave.jar to OpenRemote.
~ cp /share/Public/zwave.jar /share/HDA_DATA/.qpkg/OpenRemote/OpenRemote/webapps/controller/WEB-INF/lib/
Set up Z-wave controller
1. Register a new OpenRemote Designer account (free) or use your existing account.
2.Login the Designer Account, go to “Building Modeler” (click the first icon on the top left) and select “Config for Controller”. Select “z-wave” and enter /dev/ttyUSB0 in the “zwave.comPort” field. Then click “Submit”.

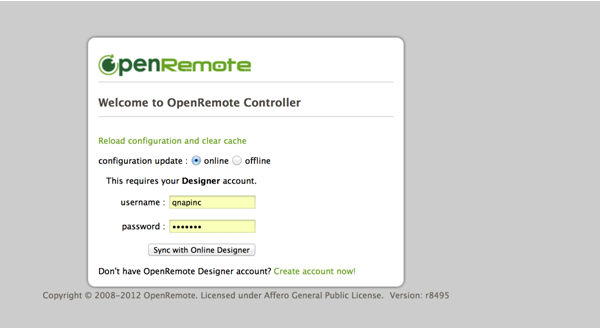
3. Go to “UI Designer” (click the second icon on the top left). Create a “New” empty panel and sync your design with the controller. To do so you should have the controller already running on your Turbo NAS. Open a web browser and enter http://localhost:8088/controller to login your controller. Then click “Sync with Online Designer”.
The controller will detect Z-Wave stack and should start the Z-Wave stack now. Please read the zwave log file “OpenRemote-Controller-2.0.1/logs/zwave/zwave.log” in a console.
You can see that there are 1 controller (Node 1) and 5 other devices (Switch:4, Dimmer:5, Sensor:6, Sensor:7, Thermostat:9) included to the controller.
Login the OpenRemote Designer account. Go to “Building Modeler” and use the “Node number” information to create “New Devices” and “Commands”.
• For Professional Designer users
A pre-installed and unlimited Z-Wave implementation with auto-device-discovery is provided (see http://www.openremote.com/solutions/) for the Turbo NAS users with an OpenRemote “Professional Designer” account. Please login the “Professional Designer” account to install the dedicated installer package.
3. Design and deploy your user interface for smartphones, tablets, or web browsers
You can use the OpenRemote “Free Designer” or “Professional Designer” accounts to design your user interface for smartphones, tablets, or web browsers. Please refer to “Design your first user interface” for the instructions. About deploying the user interface on your devices, please see “Deploy your user interface”.
4. Integrate more devices and protocols of your choice
OpenRemote supports a wide range of devices and protocols. For more information, please see “Integrate Devices & Protocols”.
Resources:
QNAP OpenRemote Forum (http://forum.qnap.com/viewforum.php?f=306)
OpenRemote Forum (http://www.openremote.org/display/forums/OpenRemote+Forums)
Contacte con nosotros
 NasChile
Av. Del Valle 662 of 401,
Ciudad Empresarial de
Huechuraba - Santiago
Chile
 Tel: +56 2 2247 9889
 Email: info@ipshop.com